NGINX Reverse Proxy Guide
This guide targets Windows and Linux (Debian-based) users.
Ports 80 and 443 must be open on your server. If you are using a firewall, you must allow these ports.
Terminology
- API: The API of SnailyCAD - the backend.
- Client: The client (UI) of SnailyCAD - the frontend.
- NGINX: NGINX is a web server that can also be used as a reverse proxy, load balancer, mail proxy and HTTP cache.
1. Installing NGINX
First, we need to install NGINX server on ur machine/server. To do this on Windows system, we download the latest version from (official site)[https://nginx.org/en/download.html]. If we use Linux we use apt package manager.
- Windows
- Linux
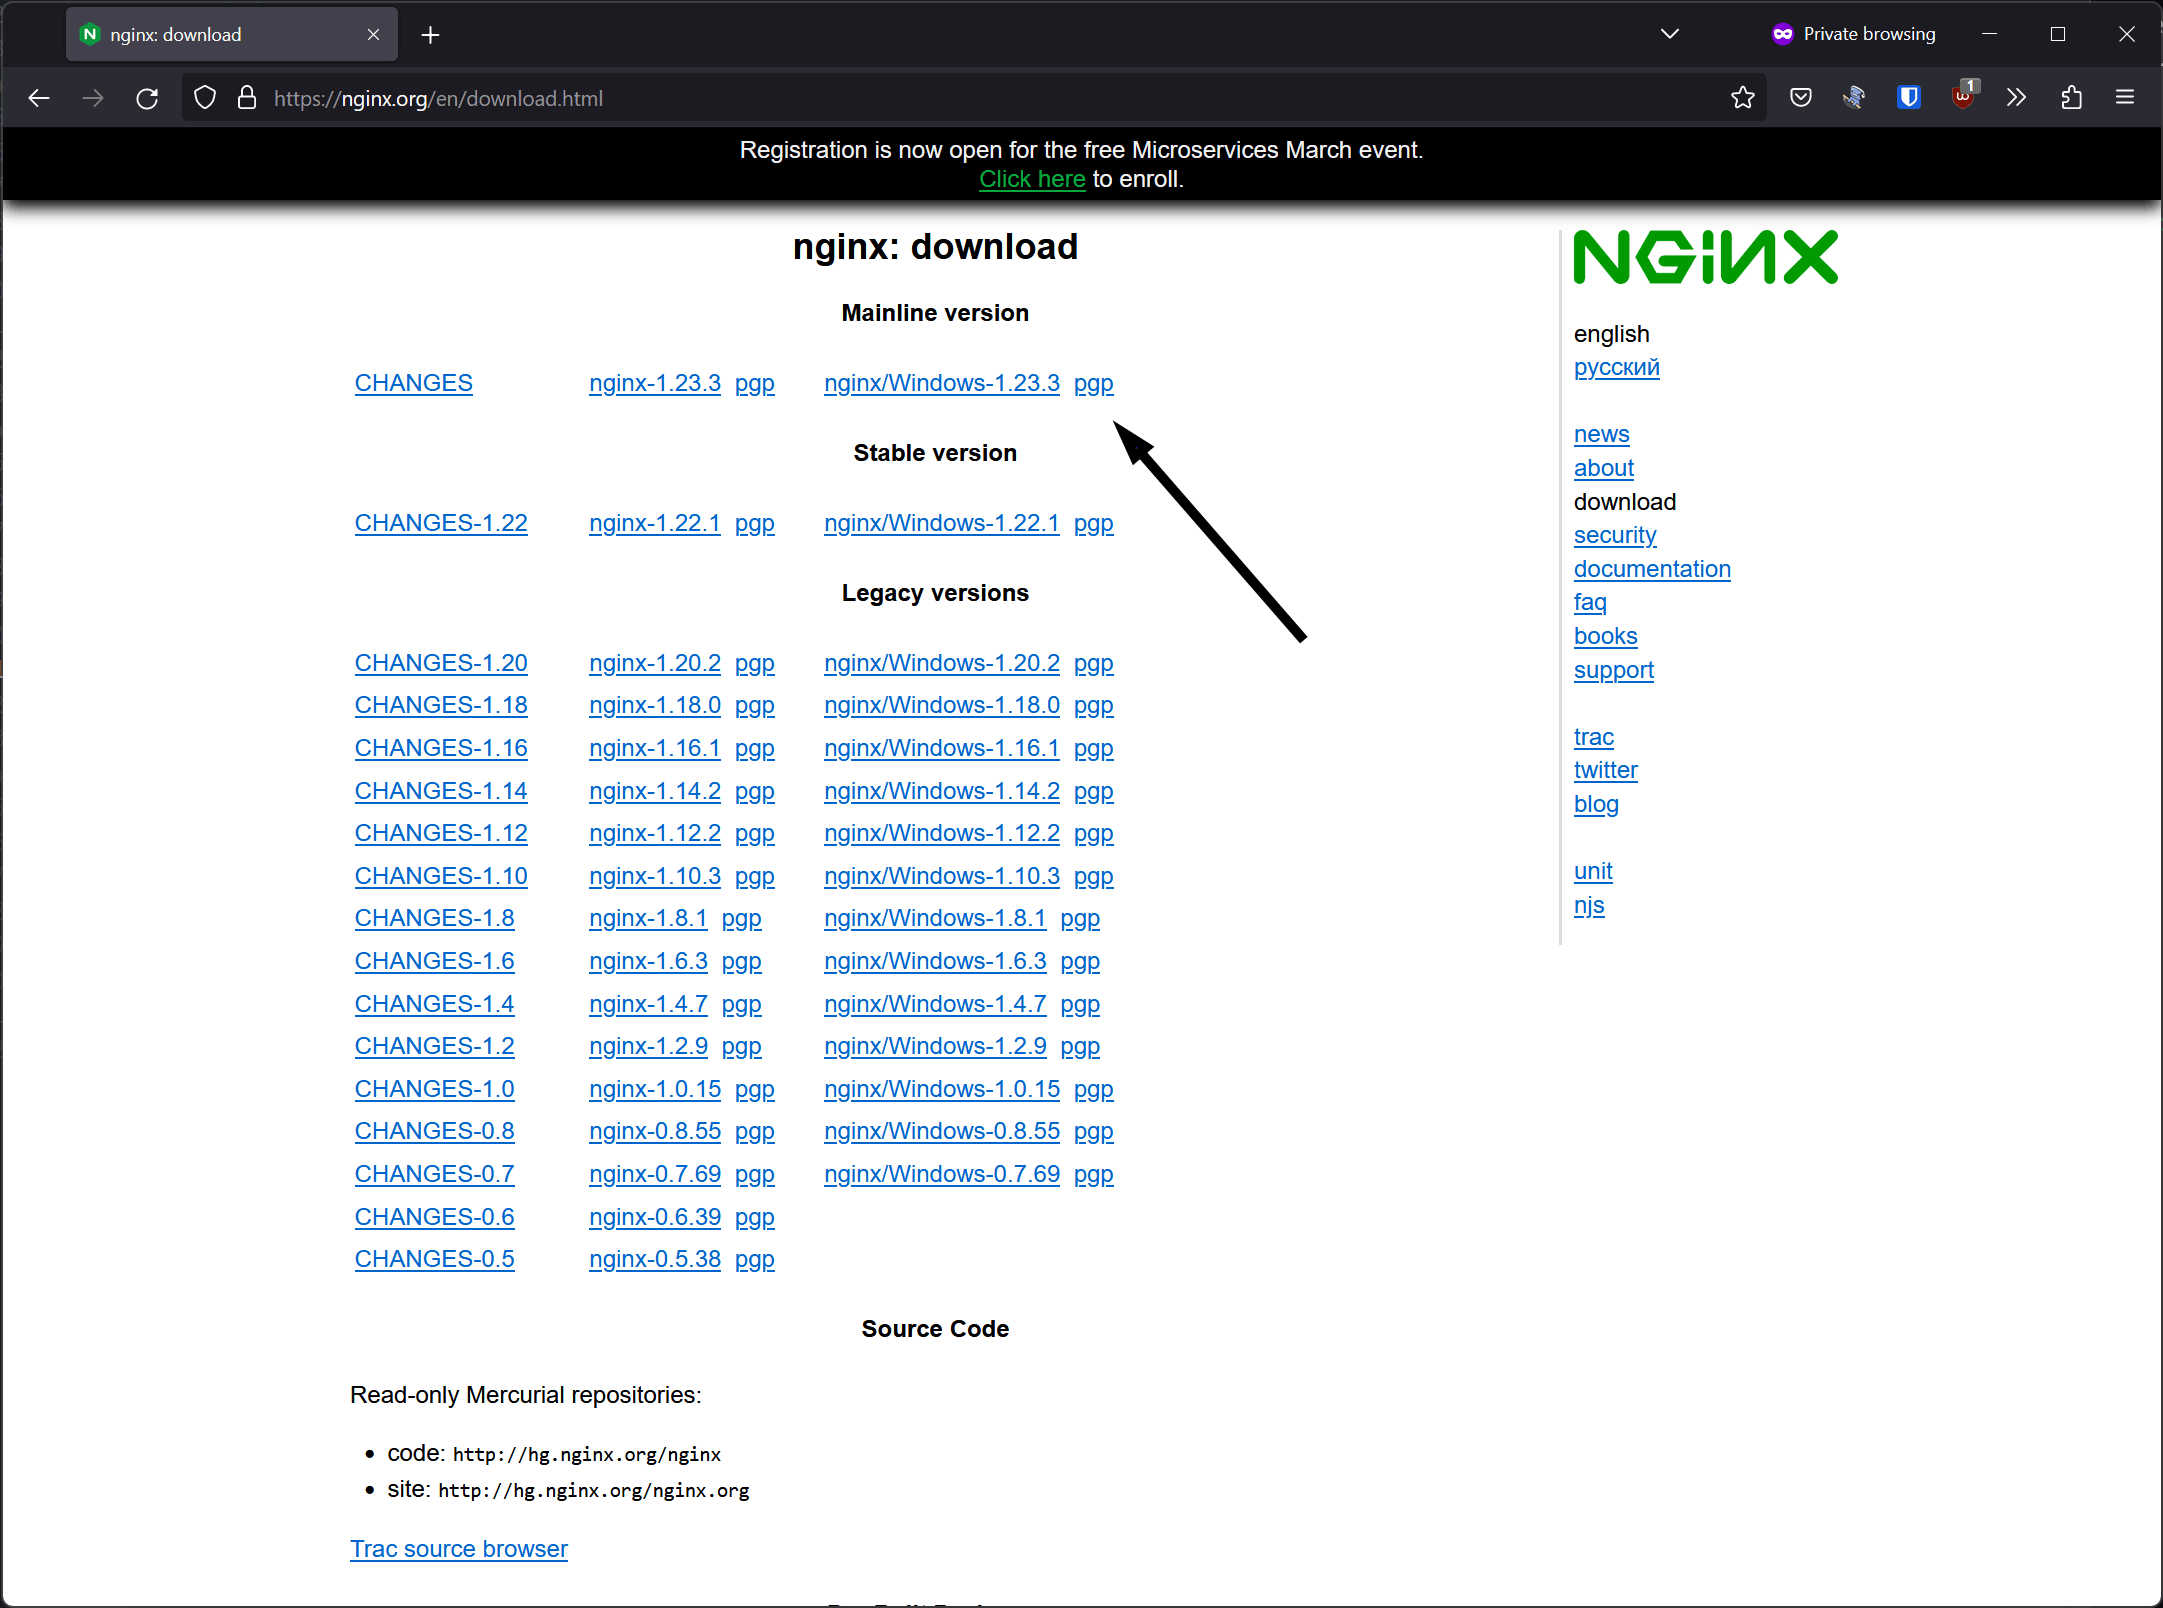
Click the url with the form of nginx/Windows-x.x.x (see the image below), this start the download of an .zip file.
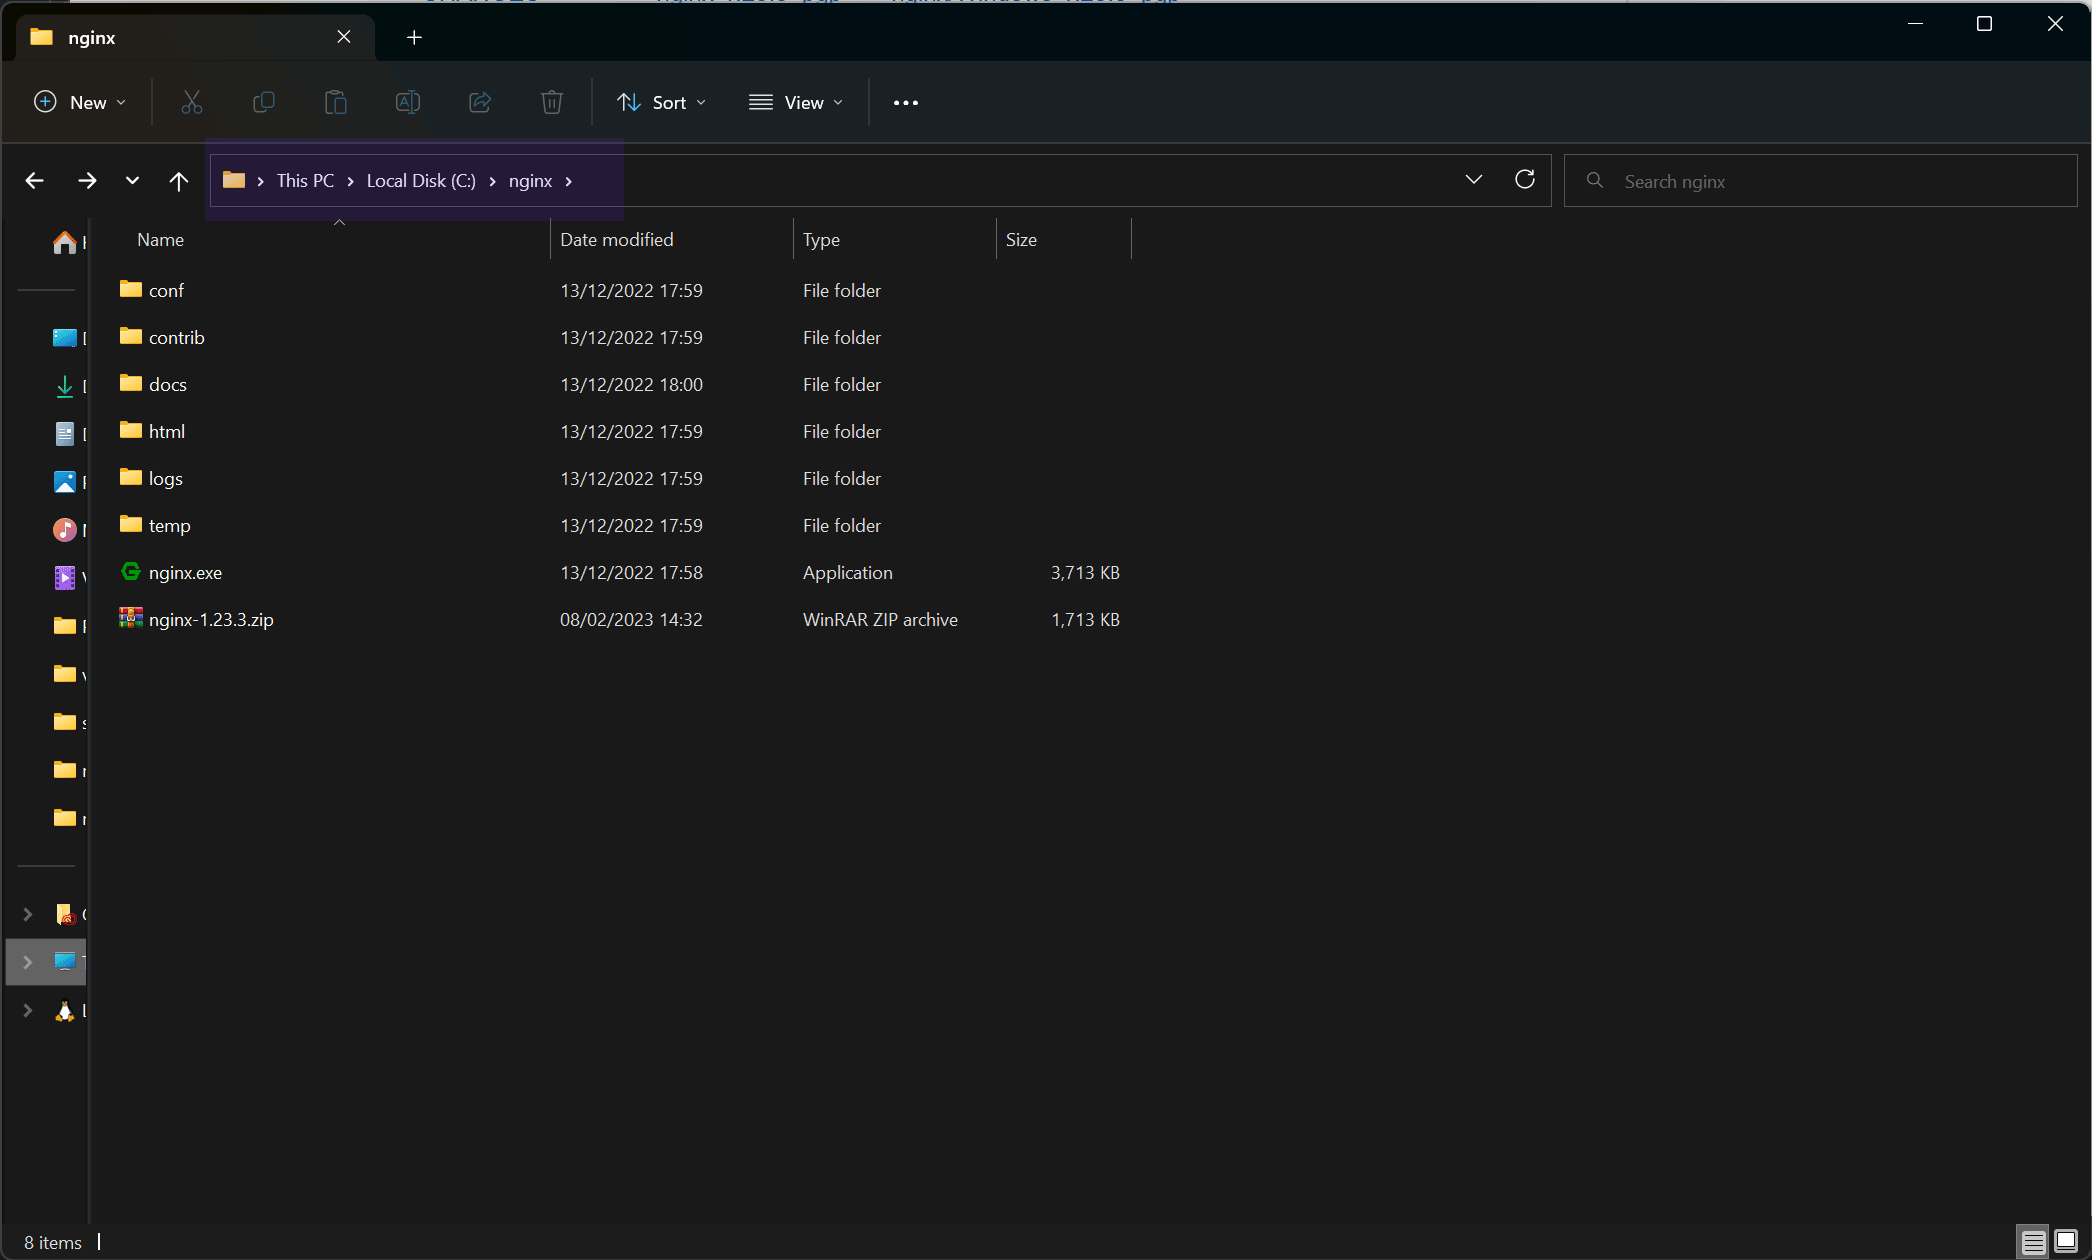
Then extract the nginx-x.x.x.zip in C: drive and rename the dir from nginx-x.x.x to nginx. After that the nginx folder look like the image below.
# Update the package manager database
sudo apt update
# Install the nginx package
sudo apt install nginx -y
2. Starting NGINX
To start NGINX you must open a command prompt or terminal and run the following command:
- Windows
- Linux
cd C:\nginx
nginx
sudo systemctl start nginx
If you have done everything correctly, you should be able to access the NGINX welcome page at http://localhost.
Keep this command prompt open. You will need to run some more commands in this command prompt.
3. Configuring NGINX
3.1. Setting client_max_body_size
To allow for larger uploads, we must set this value to 100M. Open the C:\nginx\conf\nginx.conf (Windows) or /etc/nginx/nginx.conf (Linux) file and add the following code to the http block:
http {
  # ...
  client_max_body_size 100M;
  # ...
}
This will allow uploads up to 100MB. If you want to limit the upload size to a smaller size, you can change the value to something else. For example, 10M will limit the upload size to 10MB.
3.2. Setting server_names_hash_bucket_size
To allow for longer domain names, we must set this value to 64. Open the C:\nginx\conf\nginx.conf (Windows) or /etc/nginx/nginx.conf (Linux) file and add the following code to the http block:
http {
  # ...
  server_names_hash_bucket_size 64;
  # ...
}
A full example of the nginx.conf file can be found further down this page.
3.3. Configuring the API
First, we need to configure the API. Open the C:\nginx\conf\nginx.conf (Windows) or /etc/nginx/nginx.conf (Linux) file and add the following code to the http block:
Make sure to replace the marked examples with your own values.
http {
  # ...

  # SnailyCAD API Reverse Proxy
  server {
    # Replace `example.com` with your domain name.
    server_name cad-api.example.com;

    location / {
      proxy_pass http://localhost:8080; # The API port of SnailyCAD's API (Default: 8080)
      proxy_http_version 1.1;
      proxy_set_header Upgrade $http_upgrade;
      proxy_set_header Connection 'upgrade';
      proxy_set_header Host $host;
      proxy_cache_bypass $http_upgrade;
      proxy_set_header X-Forwarded-For $proxy_add_x_forwarded_for;
    }


    # Security headers
    add_header X-XSS-Protection          "1; mode=block" always;
    add_header X-Content-Type-Options    "nosniff" always;
    add_header Referrer-Policy           "no-referrer" always;
    add_header Strict-Transport-Security "max-age=31536000; includeSubDomains; preload" always;
    add_header X-DNS-Prefetch-Control on;
    add_header Cross-Origin-Resource-Policy "cross-origin";

    # keep this as-is unless you know what you're doing.
    # for SSL, see step 6
    listen 80;
  }

  #...
}
A full example of the nginx.conf file can be found further down this page.
3.4. Configuring the client
Once the API is configured, we must add the client block. Open the C:\nginx\conf\nginx.conf (Windows) or /etc/nginx/nginx.conf (Linux) file and add the following code to the http block:
Make sure to replace the marked examples with your own values.
http {
  # ...

  # SnailyCAD Client Reverse Proxy
  server {
    # Replace `example.com` with your domain name.
    server_name cad.example.com;

    location / {
      proxy_pass http://localhost:3000; # The API port of SnailyCAD's client (Default: 3000)
      proxy_http_version 1.1;
      proxy_set_header Upgrade $http_upgrade;
      proxy_set_header Connection 'upgrade';
      proxy_set_header Host $host;
      proxy_cache_bypass $http_upgrade;
    }


    # Security headers
    add_header X-XSS-Protection          "1; mode=block" always;
    add_header X-Content-Type-Options    "nosniff" always;
    add_header Referrer-Policy           "no-referrer" always;
    add_header Strict-Transport-Security "max-age=31536000; includeSubDomains; preload" always;
    add_header X-DNS-Prefetch-Control on;
    add_header Cross-Origin-Resource-Policy "same-site";

    # keep this as-is unless you know what you're doing.
    # for SSL, see step 6
    listen 80;
  }

  # ...
}
A full example of the nginx.conf file can be found below.
Complete example nginx.conf file
#user  nobody;
worker_processes  1;

#error_log  logs/error.log;
#error_log  logs/error.log  notice;
#error_log  logs/error.log  info;

#pid        logs/nginx.pid;


events {
    worker_connections  1024;
}


http {
    include       mime.types;
    default_type  application/octet-stream;
    server_names_hash_bucket_size 64;
    client_max_body_size 100M;

    sendfile        on;
    keepalive_timeout  65;
    gzip  on;

    # SnailyCAD API Reverse Proxy
    server {
      # Replace `example.com` with your domain name.
      server_name cad-api.example.com;

      location / {
        proxy_pass http://localhost:8080; # The API port of SnailyCAD's API (Default: 8080)
        proxy_http_version 1.1;
        proxy_set_header Upgrade $http_upgrade;
        proxy_set_header Connection 'upgrade';
        proxy_set_header Host $host;
        proxy_cache_bypass $http_upgrade;
      }


      # Security headers
      add_header X-XSS-Protection          "1; mode=block" always;
      add_header X-Content-Type-Options    "nosniff" always;
      add_header Referrer-Policy           "no-referrer" always;
      add_header Strict-Transport-Security "max-age=31536000; includeSubDomains; preload" always;
      add_header X-DNS-Prefetch-Control on;
      add_header Cross-Origin-Resource-Policy "cross-origin";

      # keep this as-is unless you know what you're doing.
      listen 80;
    }


    # SnailyCAD Client Reverse Proxy
    server {
      # Replace `example.com` with your domain name.
      server_name cad.example.com;

      location / {
        proxy_pass http://localhost:3000; # The API port of SnailyCAD's client (Default: 3000)
        proxy_http_version 1.1;
        proxy_set_header Upgrade $http_upgrade;
        proxy_set_header Connection 'upgrade';
        proxy_set_header Host $host;
        proxy_cache_bypass $http_upgrade;
      }


      # Security headers
      add_header X-XSS-Protection          "1; mode=block" always;
      add_header X-Content-Type-Options    "nosniff" always;
      add_header Referrer-Policy           "no-referrer" always;
      add_header Strict-Transport-Security "max-age=31536000; includeSubDomains; preload" always;
      add_header X-DNS-Prefetch-Control on;
      add_header Cross-Origin-Resource-Policy "same-site";

      # keep this as-is unless you know what you're doing.
      listen 80;
    }

    server {
        listen       80;
        server_name  localhost;

        location / {
            root   html;
            index  index.html index.htm;
        }

        error_page   500 502 503 504  /50x.html;
        location = /50x.html {
            root   html;
        }
    }
}
3.5 Verify NGINX configuration
To verify the NGINX configuration, run the following command:
- Windows
- Linux
cd C:\nginx
nginx -t
nginx -t
If the configuration is valid, you should see the following output:
- Windows
- Linux
nginx: the configuration file C:\nginx\conf\nginx.conf syntax is ok
nginx: configuration file C:\nginx\conf\nginx.conf test is successful
nginx: the configuration file /etc/nginx/nginx.conf syntax is ok
nginx: configuration file /etc/nginx/nginx.conf test is successful
3.6. Restarting NGINX
To update the running nginx with new config, run the following command:
- Windows
- Linux
cd C:\nginx
nginx -s reload
sudo systemctl reload nginx
This command must be run every time you make changes to the nginx.conf file in the C:\nginx (Windows) or /etc/nginx (Linux) directory.
4. Updating SnailyCAD configuration
You must now update your SnailyCAD instance configuration to use the domain. To do this, open your SnailyCAD instance .env file:
# This is the URL to your site where the CAD is hosted.
CORS_ORIGIN_URL="http://cad.example.com"

# This is the URL to your site where the CAD is hosted.
NEXT_PUBLIC_CLIENT_URL="http://cad.example.com"

# The URL to where the API is hosted.
NEXT_PUBLIC_PROD_ORIGIN="http://cad-api.example.com/v1"

# The domain of your site. Without any subdomains or paths.
DOMAIN="example.com"
Now SnailyCAD is running behind NGINX. You can now access SnailyCAD by visiting http://cad.example.com with the API accessible via http://cad-api.example.com.
5. Starting NGINX on boot
To start NGINX when the system is restarted you will need to add a task to the Task Scheduler or systemd (Linux), which will run the NGINX automatically for you.
- Windows
- Linux
To achieve this on Windows, create a file with name start.bat inside C:\nginx directory and add the following code.
@ECHO OFF
REM Start Nginx
tasklist /FI "IMAGENAME eq nginx.exe" 2>NUL | find /I /N "nginx.exe">NUL
IF NOT "%ERRORLEVEL%"=="0" (
   REM Nginx is NOT running, so start it
   start nginx
   ECHO Nginx started.
) else (
   ECHO Nginx is already running.
)
Once you have added the file you'll need to open Task Scheduler and add a new task. You can follow the steps below to add this task:
- Open Task Scheduler, and in the
Task Scheduler Libraryyou will want to clickCreate Task...from the menu on the right, or buy right clicking on the folder. - Give it a name like
Start NGINX, and select 'Run whether user is logged on or not'. - Click the
Triggerstab.- Make a new trigger and in the top drop down select
At startup. - Tick
Repeat task every:and set it to5 minutes. - Click 'OK'.
- Make a new trigger and in the top drop down select
- Click the
Actionstab.- Make a new action and select
Start a programfrom the top drop down. - Browse to where the batch script was saved, which should be
C:\nginx\start.bat. - Click
OK.
- Make a new action and select
- You can now click
OKat the bottom os the task and you will need to enter the details of the user the task will run under, this should be the same account that NGINX will be running under.
This task will check every 5 minutes to see if NGINX is running, and if it is not it will start a new instance of NGINX.
To achieve this on Linux, run the following commands inside the terminal.
# Enable nginx on boot
sudo systemctl enable nginx
# Start nginx
sudo systemctl start nginx
An example of the nginx.service file can be found below.
Example of /lib/systemd/system/nginx.service file
# Stop dance for nginx
# =======================
#
# ExecStop sends SIGSTOP (graceful stop) to the nginx process.
# If, after 5s (--retry QUIT/5) nginx is still running, systemd takes control
# and sends SIGTERM (fast shutdown) to the main process.
# After another 5s (TimeoutStopSec=5), and if nginx is alive, systemd sends
# SIGKILL to all the remaining processes in the process group (KillMode=mixed).
#
# nginx signals reference doc:
# http://nginx.org/en/docs/control.html
#
[Unit]
Description=A high performance web server and a reverse proxy server
After=network.target

[Service]
Type=forking
PIDFile=/run/nginx.pid
ExecStartPre=/usr/sbin/nginx -t -q -g 'daemon on; master_process on;'
ExecStart=/usr/sbin/nginx -g 'daemon on; master_process on;'
ExecReload=/usr/sbin/nginx -g 'daemon on; master_process on;' -s reload
ExecStop=-/sbin/start-stop-daemon --quiet --stop --retry QUIT/5 --pidfile /run/nginx.pid
TimeoutStopSec=5
KillMode=mixed

[Install]
WantedBy=multi-user.target
6. Firewall
To secure your server we recommend to enable firewall, to do that following the instructions below.
- Windows
- Linux
The first time you run the nginx, opens a window and ask you to give NGINX firewall access.
To enable firewall under Linux, we will use the ufw tool. To install ufw, run the following command:
# Update the package manager database
sudo apt update
# Install the ufw package
sudo apt install ufw -y
Now we need to allow SSH, HTTP and HTTPS ports. To do this, run the following commands:
# Allow access to SSH port (22)
sudo ufw allow ssh
# Allow access to HTTP port (80)
sudo ufw allow http
# Allow access to HTTPS port (443)
sudo ufw allow https
Now we need to enable the firewall. To do this, run the following command:
sudo ufw enable
You will be asked to confirm the action. Type y and press Enter to confirm.
7. SSL
To enable SSL on Windows or Linux system we have to download some tools.
7.1. Installing tools
- Windows
- Linux
To enable SSL on Windows system, we will use win-acme tool, to generate our SSL certificates.
Download the latest release of win-acme from here (filename: win-acme.<version>.x64.pluggable.zip). Once downloaded, extract the archive (.zip) to C:\win-acme and open wacs.exe.
To enable SSL on Linux system, we will use the certbot tool. To install certbot, run the following command:
sudo apt install certbot python3-certbot-nginx
7.2. Generating SSL certificates
- Windows
- Linux
Once you have opened wacs.exe, you should see the following screen:
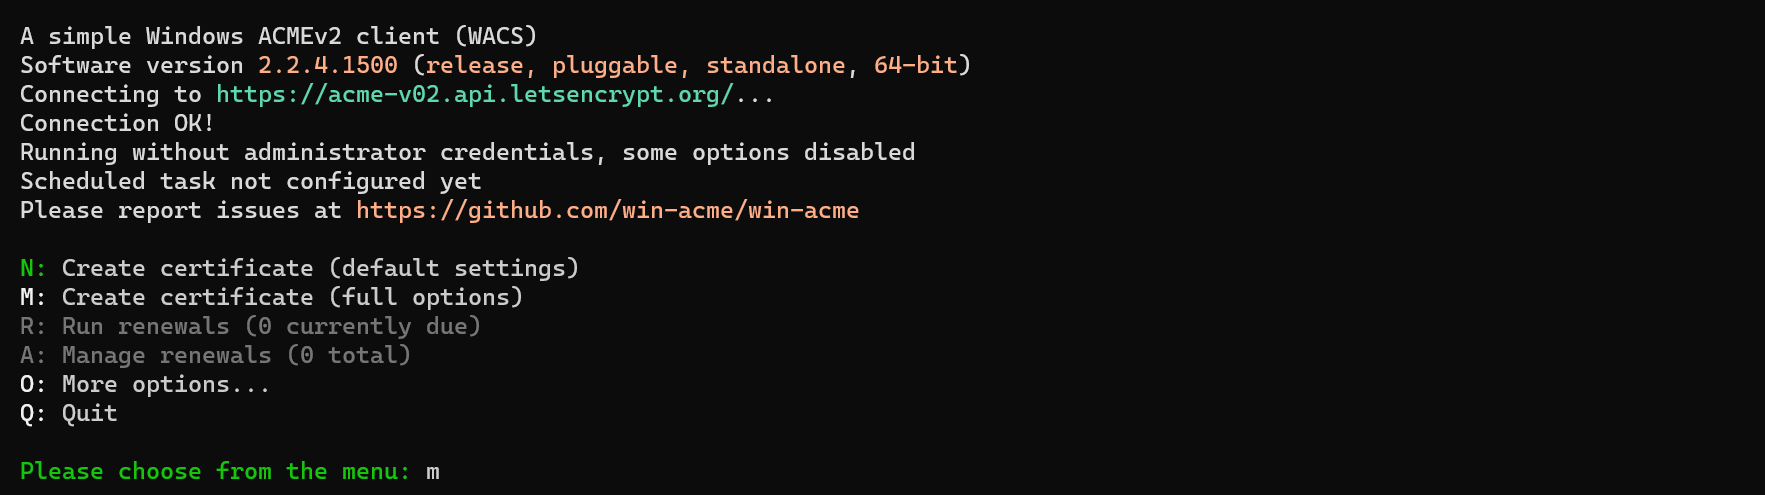
- Press
M(Create certificate (full options)) thenEnterto create a new certificate. You should now see the following screen:

- Press
2(Manual Input) thenEnter. You should now see the following screen:
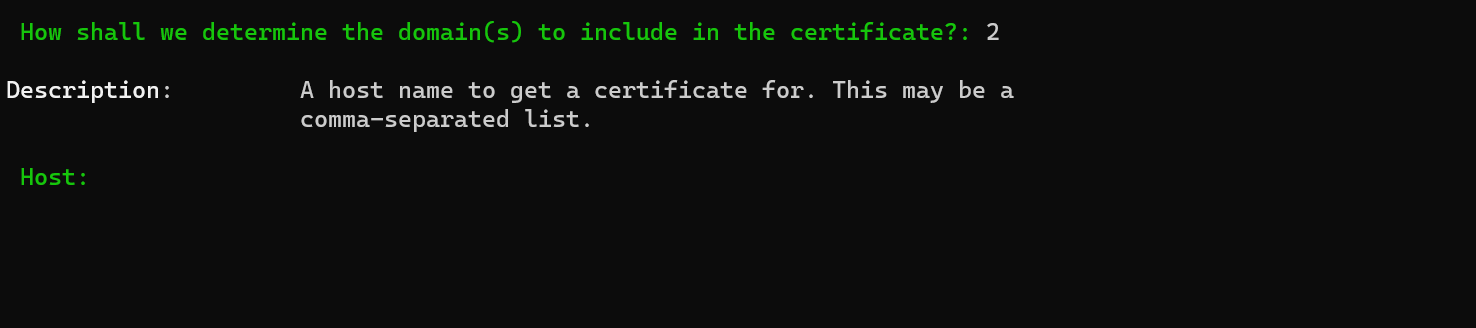
-
Enter the domains required for your SnailyCAD instance. For example, your client and API URL:
cad.example.com, cad-api.example.com. -
Press
Enterto continue. You should now see the following screen:

- Press 2 (Separate certificate for each host (e.g. sub.example.com)) then
Enter. You should now see the following screen:
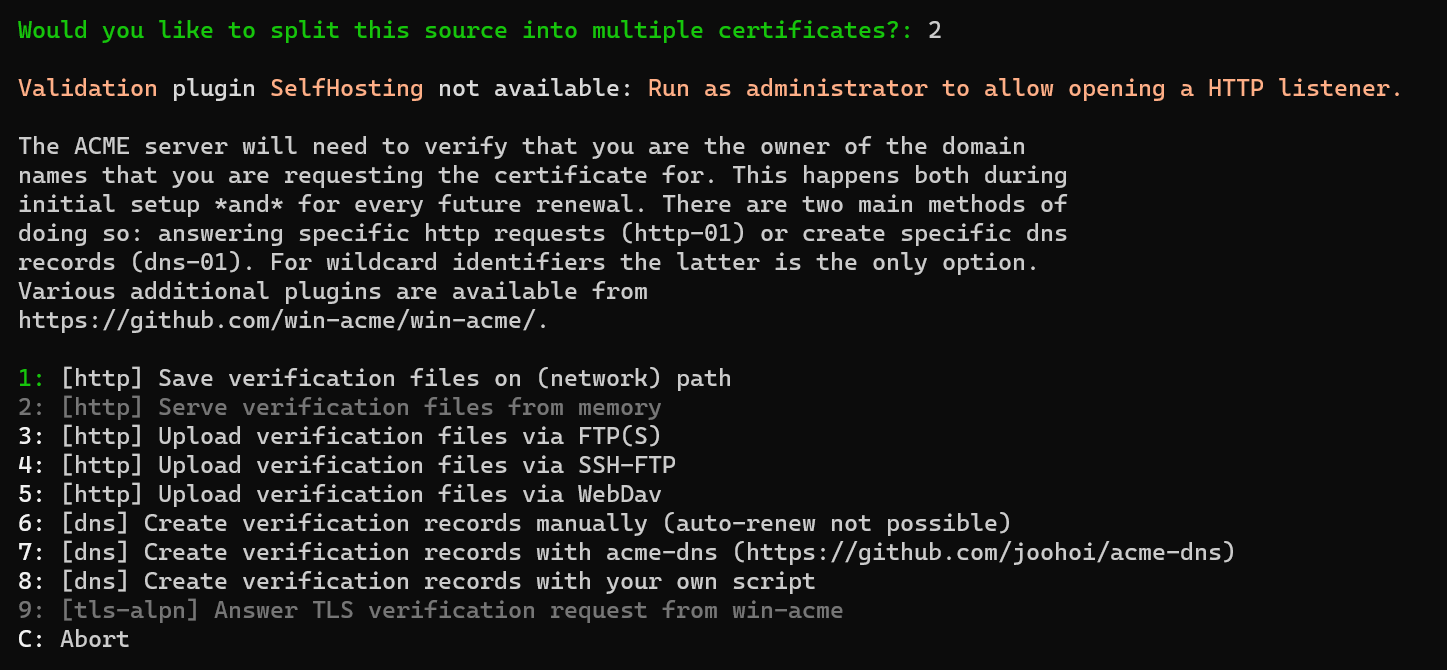
-
Press 6 ([dns] Create verification records manually) then
Enter. -
Press 2 (RSA Key) then
Enter. You should now see the following screen:
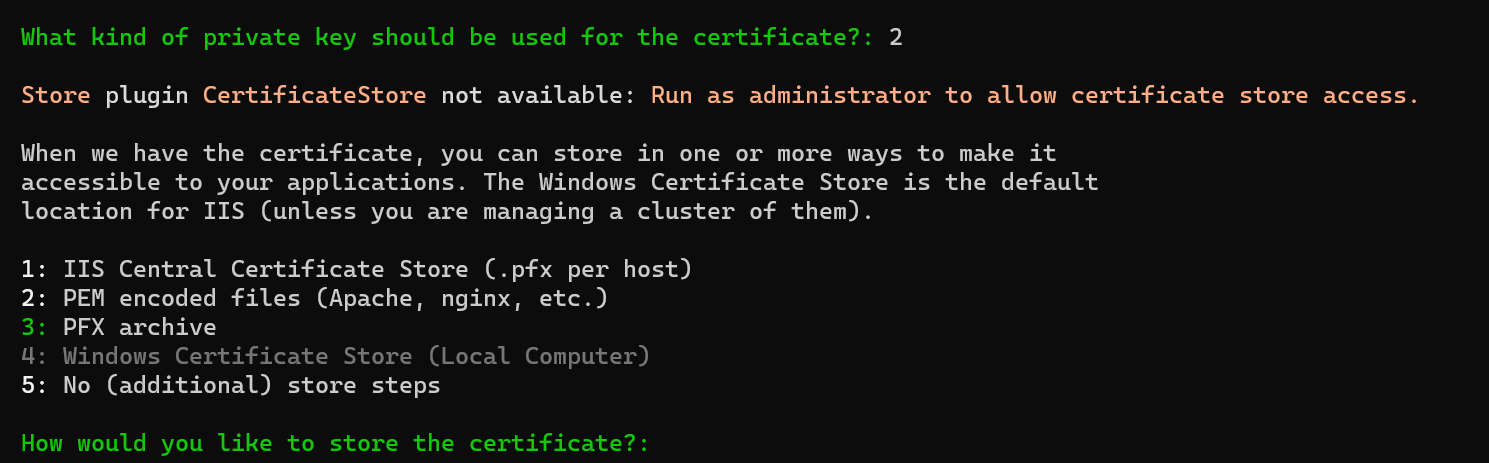
-
Press 2 (PEM encoded files (Apache, nginx, etc.)) then
Enter. It will now ask you to enter the path to where you want to store the certificate. For example,C:\ssl. PressEnterto continue. -
Press 1 (None) then
Enter. It may ask you for additional steps, press 5 (No additional steps) thenEnter. It may also ask you for an installation step, press 3 (No additional installation steps) thenEnter. -
It should now ask you to accept the terms of service. Press
ythenEnterto accept the terms of service. It should now generate the SSL certificate. Once it has finished, you should see the following screen:

-
Important: You must now add the DNS records to your domain. For example, if you are using Cloudflare, you must add the DNS records to Cloudflare. Once you have added the DNS records, press
Enterto continue. -
Continue following the prompts until it successfully generates the SSL certificate.
-
You can now close
wacs.exe.
Once you have install the certbot, run the following command to generate the SSL certificates for nginx:
certbot --nginx
You will be asked to enter your email address and agree to the terms of service. Once accepted the ToS, Certbot will ask you to select the domain name you want to generate the SSL certificate for. Select the domain name you want to generate the SSL certificate for and press Enter.
Now Certbot will generate the SSL certificate for you. Once it's done, you should see the following output:
Certificate Deployed
Successfully deployed certificate for https://cad.example.com
#...
7.3. Configuring NGINX for SSL
- Windows
- Linux
Once you have generated the SSL certificate, you must now configure NGINX to use the SSL certificate. Open the C:\nginx\conf\nginx.conf file and add or update the following code to both server blocks:
# ...
server {
  # ...

  # Previous was `listen 80;`:
  listen 443 ssl;
  http2 on;

  # Add the following lines:
  ssl_certificate C:/ssl/xxxxxxxxxxxxx-chain.pem; # The path to your SSL certificate (-chain.pem file)
  ssl_certificate_key C:/ssl/xxxxxxxxxxxxx-key.pem; # The path to your SSL certificate key (-key.pem file)
  ssl_session_timeout 5m;

  # ...
}

# ...
You can also add a redirect from http:// to https://, by adding the following code to a new server block:
server {
  listen 80 default_server;
  listen [::]:80 default_server;
  server_name _;

  return 301 https://$host$request_uri;
}
Nothing to do, continue to the next section.
7.4. Verify NGINX configuration
To verify the NGINX configuration, run the following command:
- Windows
- Linux
cd C:\nginx
nginx -t
nginx -t
If the configuration is valid, you should see the following output:
- Windows
- Linux
nginx: the configuration file C:\nginx\conf\nginx.conf syntax is ok
nginx: configuration file C:\nginx\conf\nginx.conf test is successful
nginx: the configuration file /etc/nginx/nginx.conf syntax is ok
nginx: configuration file /etc/nginx/nginx.conf test is successful
7.5. Restarting NGINX
To update the running nginx with new config, run the following command:
- Windows
- Linux
cd C:\nginx
nginx -s reload
sudo systemctl reload nginx
This command must be run every time you make changes to the nginx.conf file in the C:\nginx (Windows) or /etc/nginx (Linux) directory.
8. Updating SnailyCAD configuration
You must now update yout SnailyCAD instance configuration to use the SSL certificate. To do this, stop any running SnailyCAD instance (if exist), open your SnailyCAD instance .env file and change the following:
# This is the URL to your site where the CAD is hosted.
CORS_ORIGIN_URL="https://cad.example.com"

# This is the URL to your site where the CAD is hosted.
NEXT_PUBLIC_CLIENT_URL="https://cad.example.com"

# The URL to where the API is hosted.
NEXT_PUBLIC_PROD_ORIGIN="https://cad-api.example.com/v1"

# The domain of your site. Without any subdomains or paths.
DOMAIN="example.com"
Replace example.com with your domain name.
You can now access SnailyCAD via https://cad.example.com with the API accessible via https://cad-api.example.com.
Troubleshooting
If you are having issues with NGINX, you can check the NGINX logs.
- Windows
- Linux
To enable nginx logs, edit C:\nginx\conf\nginx.conf file and uncomment the following line:
error_log logs\error.log;
Reload the NGINX instance to enable error logging. After that check the error.log file inside C:\nginx\logs.
To do this, run the following command:
sudo tail -f /var/log/nginx/error.log